Saturday, August 18, 2012

Newest August 2012 Items

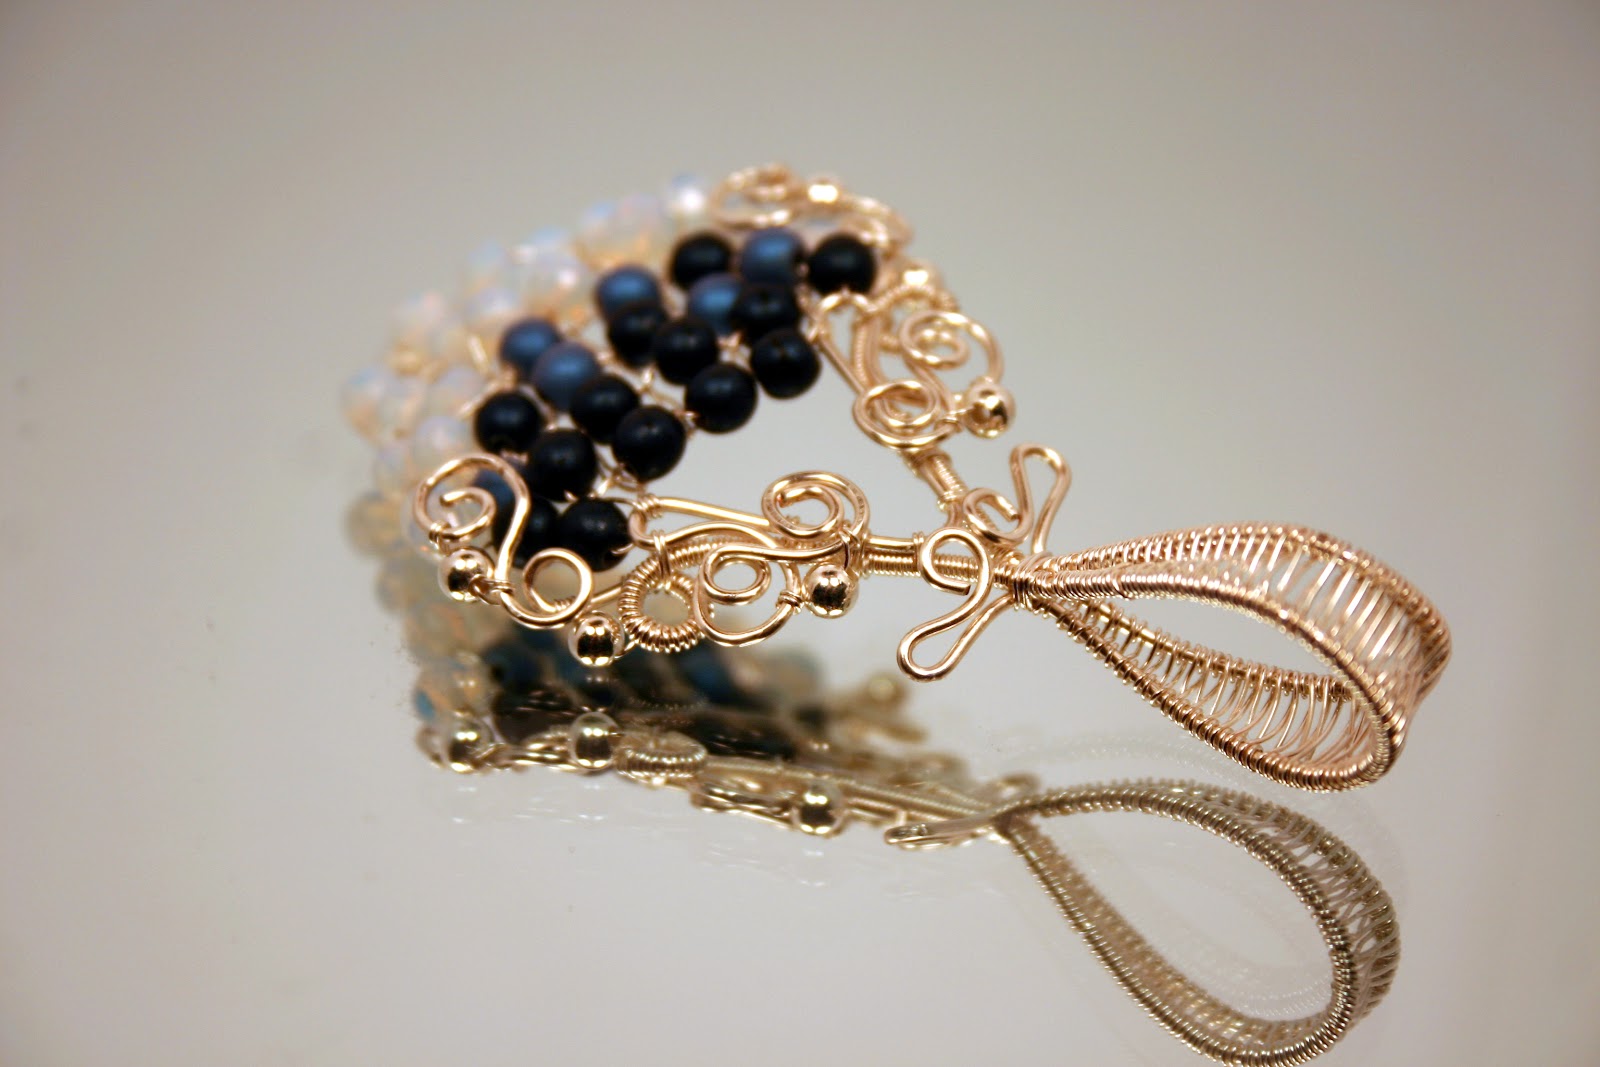
Here's a fun twist to the simple bangle design I've been selling lately. 


I call this my Bubbles Pendant. The Czech glass and Opal beads look like bubbles floating up in the ocean with a top of swirls. 


Peacock Feathers are in big now. So I made some Peacock Feather Earrings for all those who love the beautiful colors.


Thursday, August 16, 2012

Peg Board Display Case - Tutorial

This weekend my mom and I put together three of these peg board display cases. You may be asking why since we already have a ton of display supplies. After we finished up our show at Maker's Fair in Union Station and talking to some of the other crafters, we found out our next show may not have as much space as we need. Most likely, we'll only have one table. This means a large portion of our display setup...aka the grid...probably won't work. Time to go back to the drawing board.

With this in mind and my love of Pinterest, I found this awesome blog called Sugar Bee Crafts. She does shows and had a post and tutorial of the Peg Board Display Case. She has a great picture of how she uses hers as a jewelry display. And so our adventure began.

Since we haven't taken these to a show yet, the pictures are not glamorous at all. I took them pretty quick with my phone as we were working.


Supplies you'll need:

1 sheet of Peg Board - Cut this into thirds then cut the thirds in half. You'll end up with 6 pieces about 2 ft x 32 in
    *Have Lowes or Home Depot cut it for you before you purchase.

7 1x2 boards. They come in packs of 6 and were only $1 each.

Screws - Nothing fancy. Something at least an inch long just to hold everything together.

Drill - to screw the screws in.

Circular Saw - to cut the 1x2's. You could also use a hand saw. It's more labor but would work.

6 hinges - We had 3 packs of 2 from Wal-Mart on hand from a previous project.

3 locks - You can pick up 2 packs of 2 from the hardware store for around $2 each. Nothing fancy unless you want fancy.

Strap material - We picked up about 4 yards of silver strap material for Joannes for fairly cheap.

12 small washers


To Begin:

Since the do-it-yourself store cut your peg board, you don't have to worry about that. Now we just need to measure and cut your 1x2 boards to make the frame. The frame is going to go around the inside perimeter of the peg board.

You should also decide which side you want to be your "inside" portion. We chose the shorter ends to go inside the longer ends.


Step 1

To make it easy, we measured the long sides first then cut them. The 1 board of 1x2 made 3 of the long board. I think it was about 32 inches. Then we put the long boards on the peg board and measured from the inside of one to the inside of the other to get the length of the short board which was about 23 5/8 inches. Then cut out the short board. I think 1 board of 1x2 made 4 or 5 of the short boards.

You'll need 12 of each length boards.


Step 2

Once you get all your boards cut, separate them out to have 6 sets of 2 long and 2 short. Take your first set of 4 boards, 2 long and 2 short, and put them in a rectangle like the image above.

Screw each corner together. Your long board should be on the outside of your short board.


Step 3

Now that you have your frame, lay the peg board on top. If you measured correctly, the edges should be flush. 

Screw the peg board down to the frame. Be sure not to go through one of the peg holes. Your board won't stay in place if you go through the hole so choose a spot without a hole already.

Carrie screwing the peg board to the frame. Go Carrie!

Step 4

Repeat the steps 2 and 3 until all 6 of your boards are made.  (I have a picture at the start with a few made.)


Step 5

All your single boards should be done by now so we should be ready to turn it into a case. 

Stack your boards together so the frames are on the inside. We are making an open pocket so you can hang things inside and close them in. Depending on what you have, you can leave your items inside as you transport them to your next event.

We put our hinges and locks on the long sides since we are looking for height. You can put yours on the short side if you don't want something quite as tall.

Locks and Hinges

Take out the first hinge from the package. It should come with 2. We put the hinge on so that we can fully open ours so be sure to test your hinge before you screw it on. Once you have the direction, screw the hinge in place with the handy dandy screws it comes with. 


Step 6

Don't forget to add your lock. Go to the other side of the case to add this. It was a tad tricky. We had to test it before we chose the placement since we wanted to be sure that it stayed locked. Two sets of hands definitely came in handy for this...hehe.

Once you get the top part screwed in place, keeping the lower piece, carefully lift the lock. You want access to the holes for the screws but you don't want to displace your lock. Then screw it together. 


Step 7

You now have your first case. Hold that thought though, you're not fully finished. This is the point when you paint it if you want. We haven't gotten that far yet but we plan on painting it white (I already have white paint otherwise I would prefer black).


Step 8

So you can easily carry your case, lets add some straps. To come up with the length, pick up your case. Hold it so your hinges or lock are facing the front. You should have an idea of where it will be comfortable when carrying. Place your strap over your shoulder and get a length. Then begin cutting your straps so you have 3. We also made shorter ones so if we want to hold it by hand instead of over the shoulder, we could do that too.

Once you cut your straps, burn the ends to keep them from fraying.


Since we haven't painted yet, we haven't added our straps either but this is how we plan to do that.

Place your strap where you want it on your case. Be sure to have both ends on the same side so you can still open the case. Put a washer toward the edge and screw the strap in place. If your washer/screw is small enough, put two down.

Follow the same procedure for both sides and each subsequent strap.

Viola! You now have a Peg Board Display Case that you can carry to your next show.


If you don't want to hear rattling, you could try to put some foam between your items before you close the case. I haven't tried it, but it might help dampen some of the noise. I know I hate riding in the car with noisy display items.

So, what do you use inside to hang your items on? If you get the 2 inch pegboard hooks, they'll fit inside the case and the case will still be able to close. I like that idea. It's a pain to put them all in and then put in any jewelry then have to take it all off again.

Good luck! Let me know if you have any questions. I'll post a picture of our completed cases once I get them all painted.


Thanks for reading!

Brittney


Tuesday, August 14, 2012

Booth Design and Layout for 2012 - Part 1


Since we have another huge fair coming up, I thought I'd put together another post about our design and layout for our upcoming events with some tips for your next show.

Brie'Denee Booth in Art in the Park 2012 - Lawrence, KS - Booth - 2012

We were just at Art in the Park in Lawrence, KS where our new design has worked beautifully. If you didn't already know, Art in the Park is an annual event so visit next year if you missed this one! Of course, we're always adjusting and modifying our layout and design for each show we go to since we learn what works and what doesn't with each event.


If you're trying to design a booth, I would suggest trying to figure out what you need out of the booth and answering the questions below.

What are some of the restrictions of fairs you'd like to attend?

Many events post certain restrictions on their shows. Be sure to read their polices carefully. If you are a retail vendor, be sure to double check that the shows allows retail vendors. Some shows are strict on allowing only handmade while others allow both forms. 

What type of space allotment will shows be giving you?

More often than not, a show will have 10 x 10 booth spaces available. Some of the larger shows may allow vendors to purchase 2 side by side spaces to make a 10 x 20 booth. Other shows may allow only an 8 x 8 or 8 x 10. Be sure to know how much space you'll be paying for. If you have large products or display pieces you may need to reconfigure your layout to accommodate the reduction or increase in space. 


Aesthetics - Art in the Park, Lawrence, KS - 2012
Do the shows you'd like to go to have any aesthetic requirements, such as a white canopy or table cloths?

It has been in my experience that the shows with aesthetic requirements are generally slightly higher end than those without. The reason being that the hosts want to present a professional show that brings in a large clientele. If you go to a show and see all the vendors packing supplies, and everything else they hide under their tables, your first reaction is going to be, "Oh boy. That doesn't look good. I don't think I want to visit that booth because it looks like trash." However, if you go to a booth that is well coordinated and all their extras hidden you'll probably thing something more like, "Wow. This looks like a real store. What do they have?" Overall, it's this last thought that a show wants to elicit. When each booth looks nice, the show will look nice. This in turn brings in customers who tell their family and friends about the fabulous show and hopefully brings them back for the second day or the next year and ultimately increases your sales.

Most of the time you won't even realize you're thinking this so the next time you go to a show, check out each booth and how it makes you feel. Do you want to make a stop? If so, what is attracting you about the booth? What types of things make you feel comfortable that you can trust what the vendor is selling?

What types of items are you selling?

The main reason for this particular question is due to size. With jewelry, most of what we bring to a show is actually all our displays rather than the jewelry.

Everything we sell and setup (in the first picture) all fits inside this little case. Amazing really since we have hundreds of items in our inventory. 

Since jewelry is such a small type of product, we need plenty of displays to assist us in making a good booth. For something larger, like artwork, photography, mosaics, or pottery you'll definitely need a different type of setup than jewelry. Photography and art are generally setup on mobile walls to display while most pottery booths need to have plenty of sturdy shelving to hold their heavy products.


Do you currently have any display tools that you plan on utilizing?

This is a huge question. Anytime you begin to plan your booth layout, be sure to take stock of what you already have available. Funding is always a concern and the more you can re-use or re-purpose the better. It has taken us several modifications from our first booth setup before we came to our current one. Although I love what we have right now, we're continuing to think of ways to make it better, draw in customers, and really utilize as much space of that little 8x8 or 10x10 size booth. 

Are you planning on purchasing other types of displays?

Once you've reviewed all your current display tools and come up with a rudimentary layout and design, you should start to work out what else you need. For our first show, we definitely used what we had on hand. I was trying to find you a photo from that show but I'm having some difficulty. Lets just say our first show was pretty skimpy on our displays so we definitely had to purchase more. Since we bought new displays, our design and layout had to change.

Purple Zirconia and White Topaz Three Stone Prong Ring
Do you have a theme or an overall feel to your products?

This question is referring to your overall theme. Brie'Denee has a very elegant feel. Our goal is to provide an everyday piece of jewelry that transitions into evening wear nicely. We make both simple pieces that can be easily replicated to intricate art pieces that are one of a kind. With these ideas and goals in mind, we created a booth design that fits our overall feel and theme of our products. It's an important step because you want your customers to already have an idea of what your product feel is to help draw them into your booth.

Other themes would be an eclectic feel or an organic feel. Your pieces may be geared toward a time frame such as the 40's or Victorian. You may have your products more toward parties or events such as Mardi Gras. The goal is to make your booth and your products cohesive to better draw in your customers.

Our First Booth Design - 2010
Is this an indoor or outdoor event?

For obvious reasons, a few things in your booth setup and display needs are going to change for an indoor event vs an outdoor event. A canopy, weights, and space are all effected. I've found that most of the time, our layout works just fine for both indoor and outdoor events. We just either bring a canopy or don't bring a canopy.

The biggest issue we had when we first began doing shows was the wind. Jewelry is a very light product and it's generally displayed on little plastic
or paper rectangles which don't add much weight. The wind would whip through our booth and make everything fall over or blow away. Of course, this is not a good thing so we had to come up with a solution. Back to the drawing board we went. In the next part I'll show you more about what we finally ended up with for our booth layout and design, which works very well for those windy days and indoor events.

Will the show be providing access to electricity?

Most outdoor events do not provide access to electricity. Keep this in mind if you have a product that relies on a power source. You may need to bring batteries or a form of wireless or whatever.

On the other hand, most indoor events have the option for electricity. Sometimes at a cost and sometimes included in your booth fee. Be sure to read their application and policies carefully should you require power.

When we first started, we didn't have lamps or anything. We were also doing mainly outdoor events which didn't provide an option. Last year when we did an indoor event at Union Station, we found we really needed some lamps to help brighten up our space and showcase the jewelry better. We made a run to Wal-Mart the next day for a set of lamps that could clamp onto the table just like the ones to the right.


All these questions will have a large effect on your layout and overall design.

Tuesday, June 19, 2012

Maker's Faire Kansas City 2012 - A Craft and Science Fair

AAAAAHHHHH!!! It's Maker's Faire time!

We did this event last year and just loved it! They have so many things going on throughout the weekend that there's no way to be bored. This is a new event in Kansas City, however, they've had this event in cities around the country for years. They had their beginnings in San Mateo, California in 2006 then slowly made their way to Detroit, MI and New York, NY and finally to our very own KC.

Saturday, June 23, 2012,
9:30 am – 7 pm

Sunday, June 24, 2012,
9:30 am – 5 pm


One of the best things about this Fair is that it celebrates the Makers and Creaters in the world. This includes those crafty artistic types like me, a jewelry artist. The Makers that join the Faire make all kinds of things like Robots, Tesla Coils (you know...those lightening like things in the movie The Sorcer's Apprentice in 2010), Crafts, and Woodworking. Many of the booths will be having what's called a Make-and-Take so you'll get to do some projects and learn techniques directly from the Maker's.


The team that built this calls it the "Arc Attach." And yes, those people are really inside a cage that is getting struck by lightening which also happens to make music! 

Are you interested in learning how to solder? You can learn that skill this weekend from CCCKC Hakerspace at their booth. I'm pretty sure their form of soldering is geared more toward computers and such but some of the techniques and information can still be transferred to some forms of jewelry making. Last year they even had a little flyer with the steps for soldering that you can take with you. Definitely helps to remember the steps.

Did you know that Kids are Maker's too? There are two kids who will have a booth this year. A 15-year old young man named Joey created an LED cube that makes 3D patterns. While a young lady, age 10, named Sylvia hosts YouTube videos on some DIY projects such as rockets and sidewalk chalk.

Need something a little more robust? Check out the Maker Faire Blog and read up on some really neat Maker's. They'll have Art Cars, Super Hero Robots, Power Wheels Racing and Live Music.


Check out the Program Guide so you'll be ready!
You're probably wondering how I fit into this. Since this fair is for Maker's, people who create things in the "craft" bracket are invited to have a booth as well. That means yours truly gets to have a booth! 

This is our booth from Last Year. 

Although our booth turned out fantastic, we've come up with an even better design for this year. We took the new layout to Art in the Park in Lawrence, KS just a few months ago and absolutely loved it! 

Art in the Park - Lawrence, KS - May 6, 2012

The picture is a bit fuzzy, sorry about that. It was taken with my phone since I try not to travel with my good camera. Don't want to break it. At least the picture shows you what to look for!
We can't wait to see everyone! We love meeting our customers. Both Carrie (she's behind the mirror on the right. She's also in the Maker Faire Booth Photo) and I will be there. We always bring a selection of our supplies with us as well and demonstrate how we create our pieces. Please feel free to ask us any questions you may have. We are happy to answer and assist!
Have a good day everyone!
Brittney


Monday, June 18, 2012

Gemstone Lore: Aquamarine for March

As a jewelry artist, I use all sorts of gemstones. I love gemstones. Aquamarine has a soft place in my heart though since it is my sisters birth stone.


Being the patron stone of March isn't the only thing Aquamarine is known for. The light blue stone is the stone of Courage, Serenity, Love and Foresight. It was believed  to keep them safe during sea voyages in olden times. The Romans believed it to be a stone of love and gave it as a gift the morning after weddings. Such a romantic stone.

So how did we get the name Aquamarine? The beautiful blues and greens of this stone reminded people of the sea. Since the Latin word for "Seawater" is Aquamarine, it's a fitting name. The colors of this gemstone range from an almost colorless pale blue or a deep blue aqua to a blue-green and even to teal. If you are wanting jewelry that reminds you of your seaside home, Aquamarine is a great start with it's sea-worthy foamy colors.

I was really wanting to show you a picture of what I made my sister over Christmas. But like a silly person, I forgot to take any pictures before I gave her the earrings! I'll see if I can get them away from her long enough to show you the earrings. I just love them.

I had planned on having this particular post go out in March right around my sis's birthday, but as you can see, I fell a bit behind. Below are two examples of some Aquamarine in my collection. Enjoy!


These beautiful Aquamarine Pearl Drops in Gold were a custom order for Laura a few months back. The Aquamarine and Pearls make them look like sea foam on an ocean wave. 


The ring had some matching earrings which have since sold on Etsy. 


*The gemstone history information was gained from Jewels For Me's History, Legend and Lore of Aquamarine and from Bernardine Fine Art Jewelry's Aquamarine - Facts, Information and Description


Friday, June 15, 2012

Beginning Work on My Jewelry Studio

As my husband and I have recently just moved into our first home, (Yippeee!) I'm now going to have an actual studio! Granted, this is an extra bedroom that we are converting into my personal work space but it's still my studio!

The room originally had a closet. But....the closet in our bedroom was tiny and butted up to it. So, what'd we decide to do? That's right. I don't need a closet in my studio so we're combining the closets to make a slightly larger than standard small walk-in closet for our master bedroom. With this decision comes lots of work. Hopefully, we haven't bitten off more than we can chew (that comment is mainly geared toward me as my husband is one handy man). He has done a fantastic job so far on the drywall and re-wiring so far while I'm pretty awesome at the puttying part for the drywall.

So, without further ado, here are some current pictures of the room in its demolished state. I can only hope it turns out like I want it to. It's definitely not inspirational right now!


This is what the room originally looked like. The carpet stank so bad we decided to start all our home updates with this room! When we ripped the carpet out I didn't even want to touch it. It was revolting! I'm glad it's out now. We are planning on putting hardwood down and found some on discount at Home Depot. 


Here's the closet minus the doors and trip. This picture also shows the floor after we removed the carpet. Since this, we've taken the back wall out...


Here's the closet...No Wall! Sorry, I know this is dark. I took the picture on my phone. :(  Mike, that's my hubby, did the electrical work and there will be a very nice ceiling light in the closet so we can see in the morning. 


Here's Mike working on the drywall. See all that wood in the back? That was the center wall frame, all the trim, and the closet doors we took off. Most of that is now in our backyard. 

Stay tuned for more updates on the studio!

Brittney


Tuesday, June 5, 2012

Relay For Life - Walk for Breast Cancer


I am participating in the American Cancer Society’s Relay For Life because I want to make a meaningful difference in the fight against cancer and I am hoping that you will help support me and those fighting for their lives. Each of us has our own reasons for caring about the fight against cancer, but it seems that we all know someone who has personally battled this disease. 


My team and I have set a goal to raise at least $100 per teammate. Currently, I'm only $15 closer to reaching my goal. Any donation you can make, large or small, will help me reach my fundraising goal and helps us reach the greater goal of saving lives from cancer!

Please visit my personal web page to make a secure, tax-deductible online donation to the American Cancer Society. You can make a one-time gift, or increase your impact by donating monthly!  

You can Join my team or donate on my behalf and Walk with us next Friday!

2012 Relay For Life of Shawnee.
Friday, June 15 - Saturday, June 16 6pm-6am.
at Swarner Park.


Event Details12012 Relay For Life of Shawnee
Event Date: June 15th
Event Time: 6pm Friday to 6am Saturday
Event Location: Swarner Park at W. 63rd St and Lackman Rd


Purple Vertical  Divider 350x2

Opening Ceremony: 6:00pm
Survivor Lap: 6:30 pm
Fight Back: TBD
Luminaria Ceremony: 10:00 pm
Closing Ceremony: 6:00 am

No matter who you are, there's a place for you at Relay. Each dollar you raise will help save lives. How far will you go to make a difference in the fight against cancer?

Your reasons for walking in the Relay For Life are as unique and special as the story that motivates you. This is your opportunity to not only honor cancer survivors and remember people we have lost, but also to raise funds and awareness to help save lives. Because of your support, we are creating a world where cancer can't claim another year of anyone's life. You are helping create a world with less cancer and more birthdays!


Garnet Necklace for Amanda - Completing the "Amanda Collection"


This is the newest piece in my "Amanda Collection." Working on this collection began about a year ago when Amanda asked me to make her a ring for her anniversary. Since she's a January baby, she wanted her stone to be a beautiful red Garnet gemstone. She wanted the cost to stay affordable though so I ordered up some Imitation Garnet Gemstones from one of my favorite supply providers. 


The first piece I made for her last year was a Garnet Ring with a heart motif and tiny genuine Garnet accents. 


She has some earrings that match but I didn't get pictures of them. 
This year, she asked me to make her a necklace to go with her ring. I found a beautiful design by Magdalena Marszalik which I based my design on. Of course, no two pieces are alike even if an artist tries. 

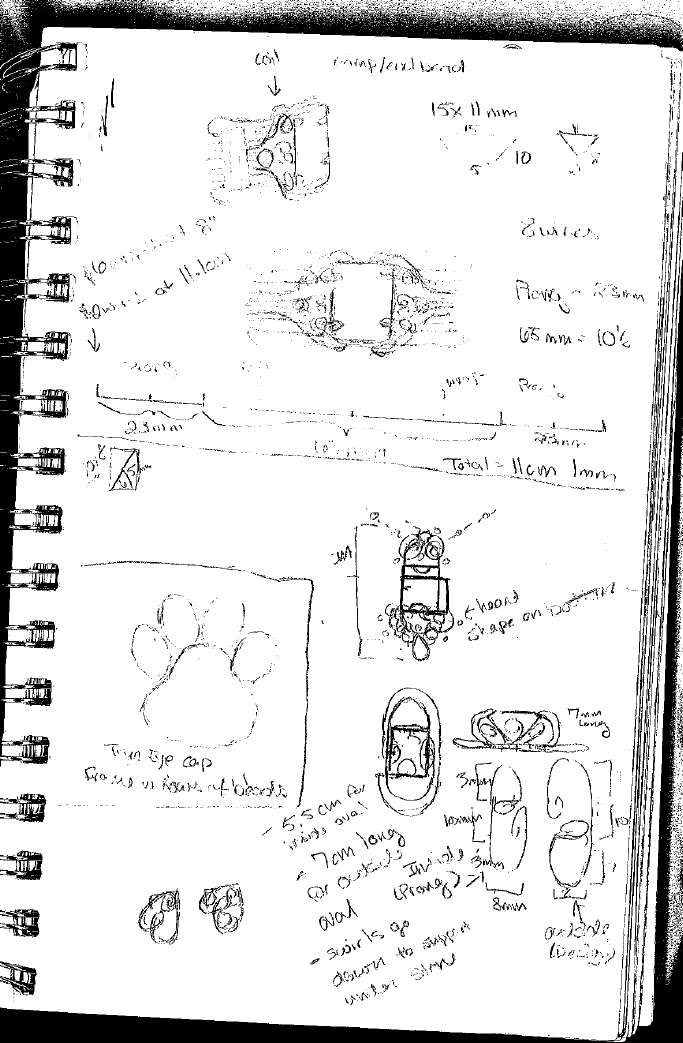
One of the first steps to beginning a design is to draw it out. I like to use a pencil, OfficeMax Just Basics Economy Woodcase Pencils, #2 Medium Soft 72/pkwhich allows me to erase any portion I don't want. Once you've got your overall design, the components have to be broken down. Can't begin something if you don't know the size of your stone or where you want to wire to go. 

Here's a picture of what this process looks like in my sketchbook. The top portion is the ring I made for Amanda and the bottom quarter is the pendant. 


I started making the pendant with the frame. Can't begin a piece without a good sturdy area to put your stone. Once that's done, it's just a matter of securing the main Garnet, adding all the beautiful filigree and scroll work then embellishing with your chosen beads. In my case, I garnished the pendant with some small 4mm Garnets and Sterling beads. Add a chain and some more embellishments and you have yourself a stunning pendant.

Each piece of this glorious necklace was handmade solely with wire. There is no soldering in this piece. It is very delicate.